Chat transcripts is an essential part of any live chat system. Reading and analyzing chat transcripts you can get lots of insights about your customers, your product, and your support team:
- which website pages chat requests are mostly initiated from
- which operating systems and browsers your customers prefer
- when your customers are more or less active
- most and least productive support agents
- how many chats were missed
- your agents qualification level
- what types of questions your customers have
How to enable chat transcripts saving
Chat transcripts are not stored on Provide Support servers by default. As soon as the chat has been finished and transcript is sent to all required email addresses, all the chat data is permanently removed from our system.
So if you wish to start storing your chat transcripts on Provide Support servers you need to enable this feature in your account Control Panel. The option is available directly from the account dashboard.
After that you'll be able to enter the transcripts viewer from your account dashboard or via the direct transcripts viewer link: https://transcripts.providesupport.com. Use your account name and password to login to the app.
How to work with the transcripts viewer
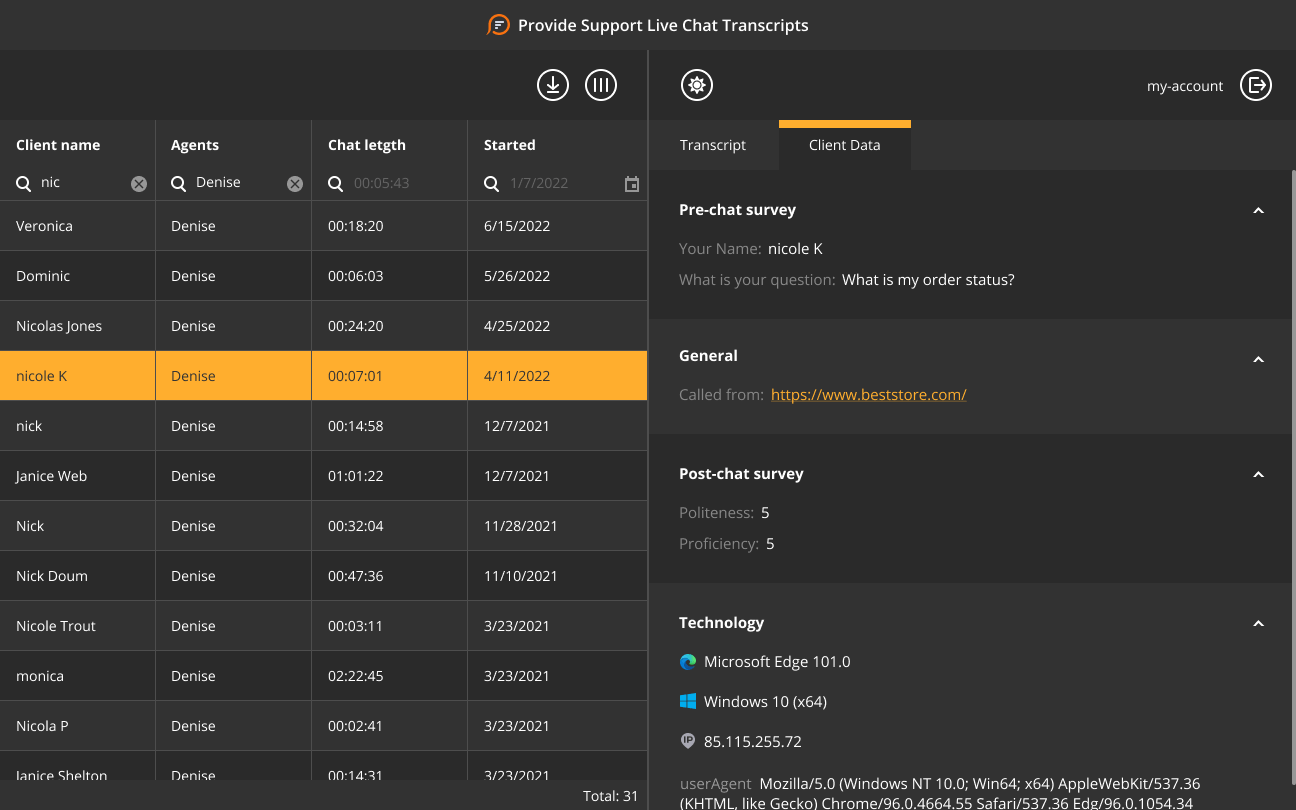
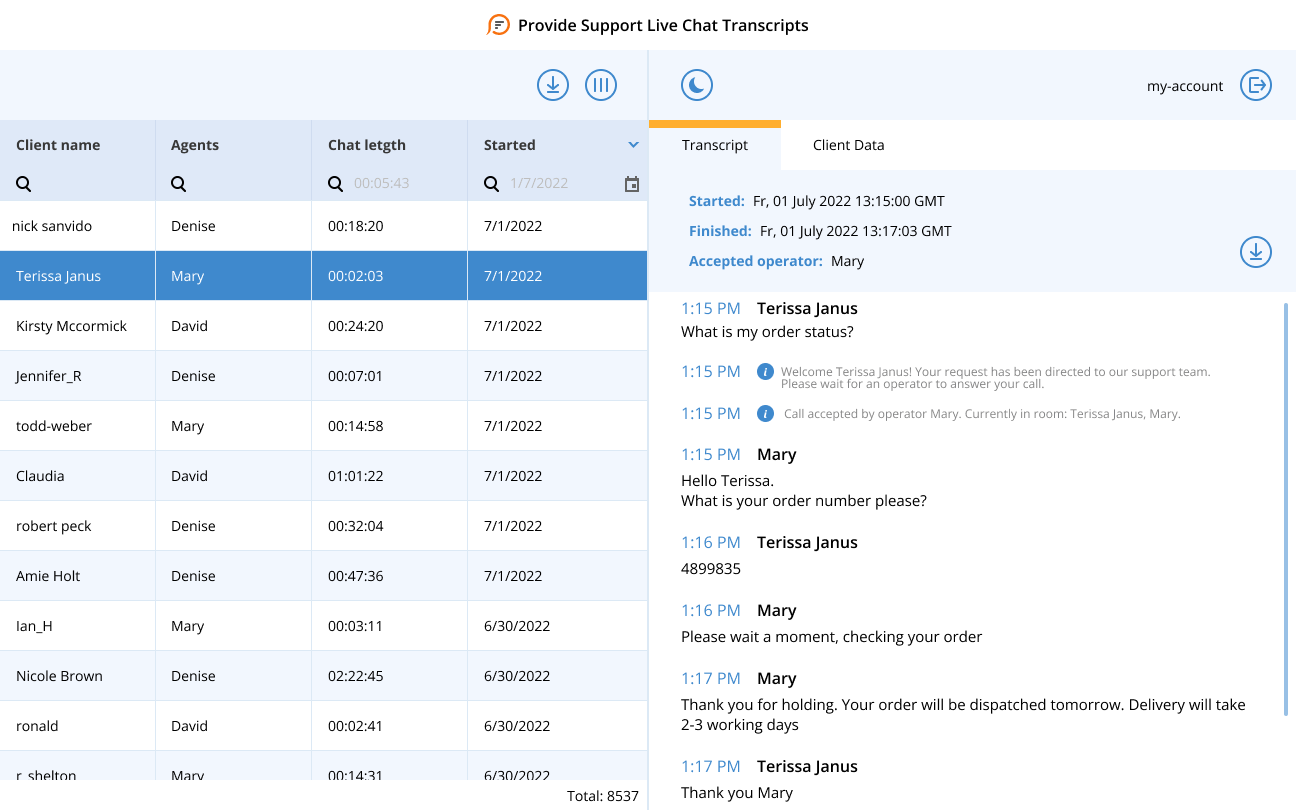
That's quite easy. Just click on the transcript record in the left pane and read the transcript text in the right pane. Visitor's data and post chat survey results are also available in the right pane, 'Client data' tab.
The transcripts list can be sorted and/or filtered by any column. Click the column title to sort the list. Click the lens icon below the column title to choose the filtering criteria.
What data is available in the transcripts table
Only three columns with the basic chat data are available by default: client name, agents, start date. However more data is available and you'd only need to configure the set of columns best fitting your needs.
The whole list of available columns is the following:
- Client name
- Agents
- Started
- Client email
- Called from
- Chat length
- Messages in chat
- Characters in chat
- IP
- OS
- Browser
Use 'Column Chooser' icon above the transcripts list to configure columns.
What you can do with chat transcripts list
Choose columns: drag and drop the columns to arrange them in a convenient order, add needed ones, and remove unnecessary ones with the help of the Column Chooser.
Group transcripts: drag the column header cell to the top pane to group transcripts by the column content. This way, you can get a summary of your chat transcripts for each agent or view chats grouped by their duration, browser, OS, etc.
Filter transcripts: click the "filter" icon in the column header cell to see the list of values available as filtering criteria. This may be the number of messages in the chat, agent or visitor name, the "called from" page, etc. You can combine several filters to get the subset of transcripts you need.
Search transcripts by criteria: click the "lens" icon under the column header cell, choose the search mode and enter a value to find transcripts that meet this specific criteria. This way, you can find transcripts by the visitor name or even by a fragment of the name, by a custom range of dates, started from a specific subnet or from the subset of "called from" pages, etc.
Both filtering and search options allow you to form a subset of chat transcripts meeting certain criteria for further exporting.
Remove chat transcripts: select and remove as many chat transcripts as you need directly in your chat transcripts viewer app.
Note! If you need to remove all your chat transcripts from our servers, just contact our support agents. They will do this within a couple of minutes.
How to export chat transcripts
You can export either a single chat transcript or export chat transcripts in a bulk.
For a single chat transcript the following options are available in the transcript preview header:
- Download the transcript as a text or HTML file. Use the 'download' icon at the right of the transcript header for this, and choose the Text or HTML option.
- Forward the transcript to email. Use 'email' icon at the right of the transcript header for this.
For several chat transcripts the following options are available in the transcripts list toolbar:
- Export all or selected transcripts to XLSX. This means exporting transcripts' basic data (such as client name, agents, date, client email if provided, etc.) to a table.
- Export all or selected transcripts to TXT. This means exporting the whole chat transcript text, including its basic data, visitor details, and post chat survey results.
What's next?
We are constantly working on improving the transcripts viewer. Our plans for the nearest future are the following:
- to add full-text transctipt search
We also plan to add chats tagging to both agent apps and transcripts viewer. This will help to categorize chats and will make transcripts reviewing more comfortable.
